1. 关于阅读源码
工作中使用到的框架容易成为最熟悉的陌生代码,可以熟练使用,但是并不知道其中原理。阅读源码可以帮助我们知其然,亦知其所以然,既可以在工作中更好的使用框架特性,也可以借鉴其中优秀的设计思想。
但是面对框架庞大的代码量,往往不知如何下手。总结了一些方法,可以帮助coder战胜恐惧,顺利的开始阅读源码。
1.1. 屏蔽干扰
简单粗暴的减法,根据包名猜测作用,排除主流程外代码
如MyBatis的包结构如下
annotations 注解类,流程实现无关- binding 代理 *
- builder 构造 *
cache 缓存相关,后续独立阅读- datasource 数据源
exceptions 异常封装- executor 具体的执行 **
io 文件流jdbc logging 日志,后续独立阅读- mapping 映射,sql映射,参数映射,结果映射
- parsing sql解析
plugin 插件reflection 反射- scripting 脚本
- session 会话请求 *
transaction 事务管理,后续独立阅读type 类型转换,后续独立阅读
需要阅读的包列表如下
- binding 代理 *
- builder 构造 *
- datasource 数据源
- executor 具体的执行 **
- mapping 映射,sql映射,参数映射,结果映射
- parsing sql解析
- scripting 脚本
- session 会话请求 *
1.2. 找到入口
代码是逻辑的实现,找到入口,根据功能逻辑逐步阅读。入口一般为
- 启动类
- 根据具体的使用方法debug跟踪
1.3. 不纠结细节,不扩散思维
根据方法名明确其作用,熟悉整体流程时,不过分纠结具体实现细节(如:锁),明确作用主线,不要扩散到其他实现中
2. 基础知识点
阅读源码前先补充两个知识点
2.1. 代理
代理(Proxy)是一种设计模式,提供了对目标对象另外的访问方式;即通过代理对象访问目标对象.这样做的好处是:可以在目标对象实现的基础上,增强额外的功能操作,即扩展目标对象的功能. 不破坏开闭原则的前提下,实现了功能的修改。AOP也是采用了这种设计模式。

2.1.1. 静态代理
需求(issue)需要编码(coding)实现,程序员(Coder)负责编码,但是issue不应该直接找coder,产品经理(PM)负责在coding前后进行需求梳理、需求验收。但是PM不应该直接修改程序员的coding过程,所以PM就是一层代理,在coder无感知的情况下增加了功能与访问控制。
1
2
3
4
5
6
7
8
9
10
11
12
13
14
15
16
17
18
19
20
21
22
23
24
25
26
27
28
29
30
31
32
33
34
35
36
37
38
39
40
| public class StaticProxy {
public static void main(String[] args) {
Issue client = new PM();
client.coding();
}
static interface Issue {
void coding();
}
static class Coder implements Issue {
@Override
public void coding() {
System.out.println("coding");
}
}
static class PM implements Issue {
private static Issue issue = new Coder();
@Override
public void coding() {
this.beforeDoing();
issue.coding();
this.afterDoing();
}
private void beforeDoing() {
System.out.println("需求梳理");
}
private void afterDoing() {
System.out.println("需求验收");
}
}
}
|
2.1.2. 动态代理
上面的代码有两个bug,
- 如果我有多个程序员,如JavaCoder、PythonCoder,那么是不是也需要多个PM吗?
- PM不会coding。。。
为了解决这两个问题,需要用到动态代理
1
2
3
4
5
6
7
8
9
10
11
12
13
14
15
16
17
18
19
20
21
22
23
24
25
26
27
28
29
30
31
32
33
34
35
36
37
38
39
40
41
42
43
44
45
46
47
48
49
50
51
52
53
54
55
56
57
58
59
| public class DynamicProxy {
public static void main(String[] args) {
PM pmWithPython = new PM(new PythonCoder());
PM pmWithJava = new PM(new JavaCoder());
Issue pythonIssue = (Issue) Proxy.newProxyInstance(ClassLoader.getSystemClassLoader(),
new Class[]{Issue.class},
pmWithPython);
pythonIssue.coding();
Issue javaIssue = (Issue) Proxy.newProxyInstance(ClassLoader.getSystemClassLoader(),
new Class[]{Issue.class},
pmWithJava);
javaIssue.coding();
}
interface Issue {
void coding();
}
static class JavaCoder implements Issue {
@Override
public void coding() {
System.out.println("coding by java");
}
}
static class PythonCoder implements Issue {
@Override
public void coding() {
System.out.println("coding by python");
}
}
static class PM implements InvocationHandler {
private Issue issue;
public PM(Issue issue) {
this.issue = issue;
}
@Override
public Object invoke(Object proxy, Method method, Object[] args) throws Throwable {
beforeDoing();
proxy = method.invoke(issue, args);
afterDoing();
return proxy;
}
private void beforeDoing() {
System.out.println("需求梳理");
}
private void afterDoing() {
System.out.println("需求验收");
}
}
}
|
很多人会纠结,代理模式和装饰模式有什么区别,网上大多数的文章说装饰模式是为了增强功能,代理模式是为了控制访问,这是不能赞同的一种说法。我认为区别在于思想,装饰模式是你明确知道要把某个对象做哪些扩展,而代理则是你不和对象直接交互,而是通过第三者沟通。 动态代理,则是可以选择无关的第三者,不需要有共同的接口或父类。
2.2. JDBC
简单的实现代码
1
2
3
4
5
6
7
8
9
10
11
12
13
14
15
16
17
18
19
20
21
| import java.sql.*;
public class JdbcApp {
private static String url = "jdbc:mysql://localhost:3306/mysql";
private static String username = "root";
private static String password = "";
public static void main(String[] args) throws ClassNotFoundException, SQLException {
Class.forName("com.mysql.jdbc.Driver");
Connection connection = DriverManager.getConnection(url, username, password);
Statement statement = connection.createStatement();
ResultSet resultSet = statement.executeQuery("select * from user");
if (resultSet.next()) {
String Host = resultSet.getString("Host");
String User = resultSet.getString("User");
System.out.println("Host: " + Host + ", User: " + User);
}
}
}
|
2.2.1 JDBC做了哪些事

2.2.2 Class.forName做了什么?
通过反射将驱动注册进DriverManager中,用于创建connection时使用。
1
2
3
4
5
6
7
8
9
10
11
12
13
14
15
16
17
| package com.mysql.cj.jdbc;
import java.sql.DriverManager;
import java.sql.SQLException;
public class Driver extends NonRegisteringDriver implements java.sql.Driver {
public Driver() throws SQLException {
}
static {
try {
DriverManager.registerDriver(new Driver());
} catch (SQLException var1) {
throw new RuntimeException("Can't register driver!");
}
}
}
|
1
2
3
4
5
6
7
8
9
10
11
12
13
14
15
16
17
18
19
20
21
22
23
24
25
26
27
28
29
30
31
32
33
34
35
36
37
38
39
40
41
42
43
44
45
46
47
48
49
50
51
52
53
54
| public class DriverManager {
private static Connection getConnection(
String url, java.util.Properties info, Class<?> caller) throws SQLException {
ClassLoader callerCL = caller != null ? caller.getClassLoader() : null;
synchronized(DriverManager.class) {
if (callerCL == null) {
callerCL = Thread.currentThread().getContextClassLoader();
}
}
if(url == null) {
throw new SQLException("The url cannot be null", "08001");
}
println("DriverManager.getConnection(\"" + url + "\")");
SQLException reason = null;
for(DriverInfo aDriver : registeredDrivers) {
if(isDriverAllowed(aDriver.driver, callerCL)) {
try {
println(" trying " + aDriver.driver.getClass().getName());
Connection con = aDriver.driver.connect(url, info);
if (con != null) {
println("getConnection returning " + aDriver.driver.getClass().getName());
return (con);
}
} catch (SQLException ex) {
if (reason == null) {
reason = ex;
}
}
} else {
println(" skipping: " + aDriver.getClass().getName());
}
}
if (reason != null) {
println("getConnection failed: " + reason);
throw reason;
}
println("getConnection: no suitable driver found for "+ url);
throw new SQLException("No suitable driver found for "+ url, "08001");
}
}
|
反射运行静态块,但是不会生成实例。
2.2.3 可以不写Class.forName吗?
可以,因为DriverManager中通过spi初始化了驱动。
1
2
3
4
5
6
7
8
9
10
11
12
13
14
15
16
17
18
19
20
21
22
23
24
25
26
27
28
29
30
31
32
33
34
35
36
37
38
39
40
41
42
43
44
45
46
47
48
49
50
51
52
53
54
| public class DriverManager {
private final static CopyOnWriteArrayList<DriverInfo> registeredDrivers = new CopyOnWriteArrayList<>();
static {
loadInitialDrivers();
println("JDBC DriverManager initialized");
}
private static void loadInitialDrivers() {
String drivers;
try {
drivers = AccessController.doPrivileged(new PrivilegedAction<String>() {
public String run() {
return System.getProperty("jdbc.drivers");
}
});
} catch (Exception ex) {
drivers = null;
}
AccessController.doPrivileged(new PrivilegedAction<Void>() {
public Void run() {
ServiceLoader<Driver> loadedDrivers = ServiceLoader.load(Driver.class);
Iterator<Driver> driversIterator = loadedDrivers.iterator();
try{
while(driversIterator.hasNext()) {
driversIterator.next();
}
} catch(Throwable t) {
}
return null;
}
});
println("DriverManager.initialize: jdbc.drivers = " + drivers);
if (drivers == null || drivers.equals("")) {
return;
}
String[] driversList = drivers.split(":");
println("number of Drivers:" + driversList.length);
for (String aDriver : driversList) {
try {
println("DriverManager.Initialize: loading " + aDriver);
Class.forName(aDriver, true,
ClassLoader.getSystemClassLoader());
} catch (Exception ex) {
println("DriverManager.Initialize: load failed: " + ex);
}
}
}
}
|
对spi做一个简单的介绍
SPI 简介SPI 全称为(Service Provider Interface) ,是JDK内置的一种服务提供发现机制。
简单来说,我们定义了一个服务interface,jar包可以编写实现,并通过文件声明实现类,让服务发现并动态替换。
1
2
3
4
5
6
7
8
9
10
11
12
13
14
15
16
17
18
| public interface SpiDemoApi {
void print();
}
public class SpiDemoImplA implements SpiDemoApi {
@Override
public void print() {
System.out.println("spi A impl");
}
}
public class SpiDemoImplB implements SpiDemoApi {
@Override
public void print() {
System.out.println("spi B impl");
}
}
|
在META-INF/services目录下以接口全路径名命名的文件,并在其中声明实现类的全路径名。声明的方法可以通过ServiceLoader发现
1
2
3
4
5
6
7
8
9
10
| import java.util.ServiceLoader;
public class SpiApp {
public static void main(String[] args) {
ServiceLoader<SpiDemoApi> serviceLoader = ServiceLoader.load(SpiDemoApi.class);
for (SpiDemoApi service : serviceLoader) {
service.print();
}
}
}
|
dubbo、log、jdbc都使用了spi相关技术。
spi
dubbo log jdbc
SpringFactoriesLoader
2.3. 反射
2.3.1 类
3. MyBatis
MyBatis 是一款优秀的持久层框架,它支持定制化 SQL、存储过程以及高级映射。MyBatis 避免了几乎所有的 JDBC 代码和手动设置参数以及获取结果集。MyBatis 可以使用简单的 XML 或注解来配置和映射原生信息,将接口和 Java 的 POJOs(Plain Old Java Objects,普通的 Java对象)映射成数据库中的记录。
3.1. 入口
因为springboot给我们带来开发便利的同时,隐藏了太多细节,已经忘记了MyBatis的启动方式。
3.2. driver + connection
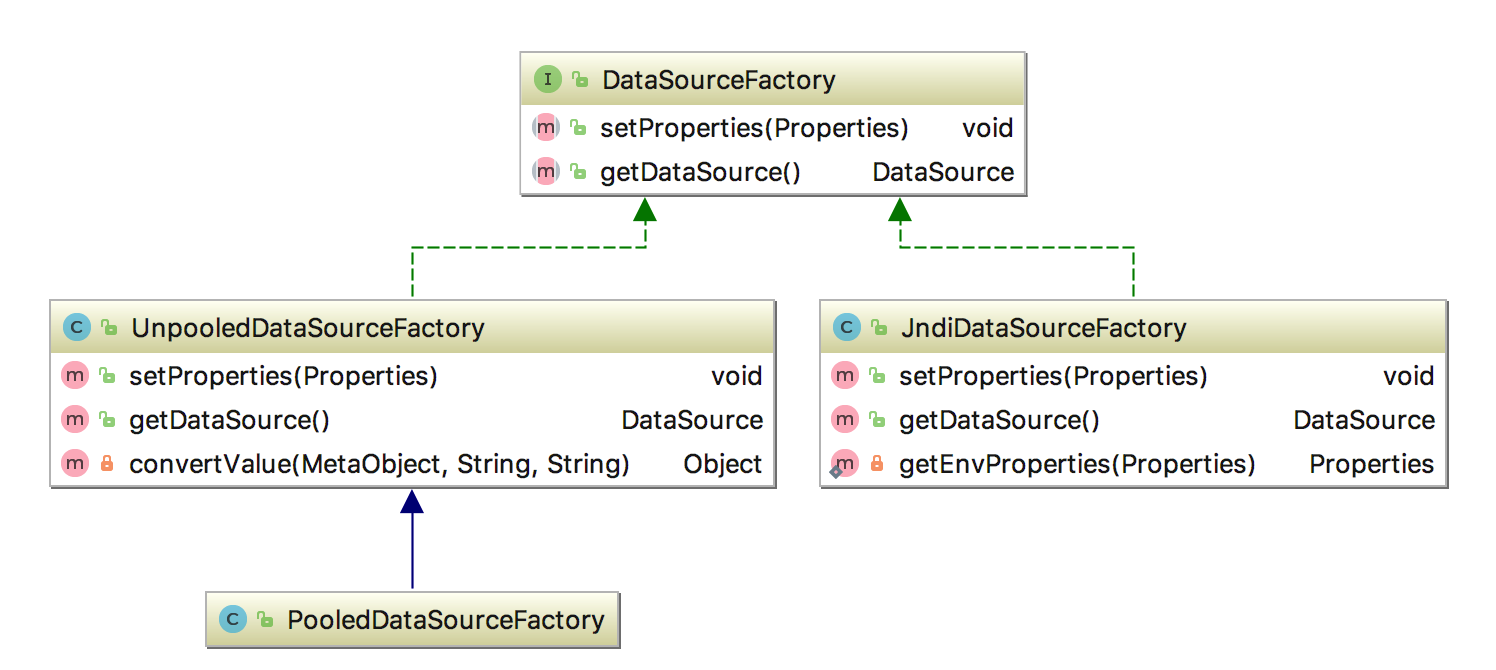
在实际应用的过程中,每次都创建一次connection会极大的影响性能,所以我们会选择连接池技术,简单来说就是维护一个connection的list,每次请求从list中取出一个connection。Mybatis提供了3中方式实现数据源初始化。

每次获取connection都会判断driver是否已注册
1
2
3
4
5
6
7
8
9
10
11
12
13
14
15
16
17
18
19
20
21
22
23
24
25
26
| private Connection doGetConnection(Properties properties) throws SQLException {
initializeDriver();
Connection connection = DriverManager.getConnection(url, properties);
configureConnection(connection);
return connection;
}
private synchronized void initializeDriver() throws SQLException {
if (!registeredDrivers.containsKey(driver)) {
Class<?> driverType;
try {
if (driverClassLoader != null) {
driverType = Class.forName(driver, true, driverClassLoader);
} else {
driverType = Resources.classForName(driver);
}
Driver driverInstance = (Driver)driverType.newInstance();
DriverManager.registerDriver(new DriverProxy(driverInstance));
registeredDrivers.put(driver, driverInstance);
} catch (Exception e) {
throw new SQLException("Error setting driver on UnpooledDataSource. Cause: " + e);
}
}
}
|
PooledConnection 使用了动态代理,在不改变Connection的前提下,使关闭的connection加入到闲置连接池内。
1
2
3
4
5
6
7
8
9
10
11
12
13
14
15
16
17
18
19
20
21
22
23
24
| class PooledConnection implements InvocationHandler {
...
@Override
public Object invoke(Object proxy, Method method, Object[] args) throws Throwable {
String methodName = method.getName();
if (CLOSE.hashCode() == methodName.hashCode() && CLOSE.equals(methodName)) {
dataSource.pushConnection(this);
return null;
} else {
try {
if (!Object.class.equals(method.getDeclaringClass())) {
checkConnection();
}
return method.invoke(realConnection, args);
} catch (Throwable t) {
throw
ExceptionUtil.unwrapThrowable(t);
}
}
}
...
}
|
3.3. statement + query
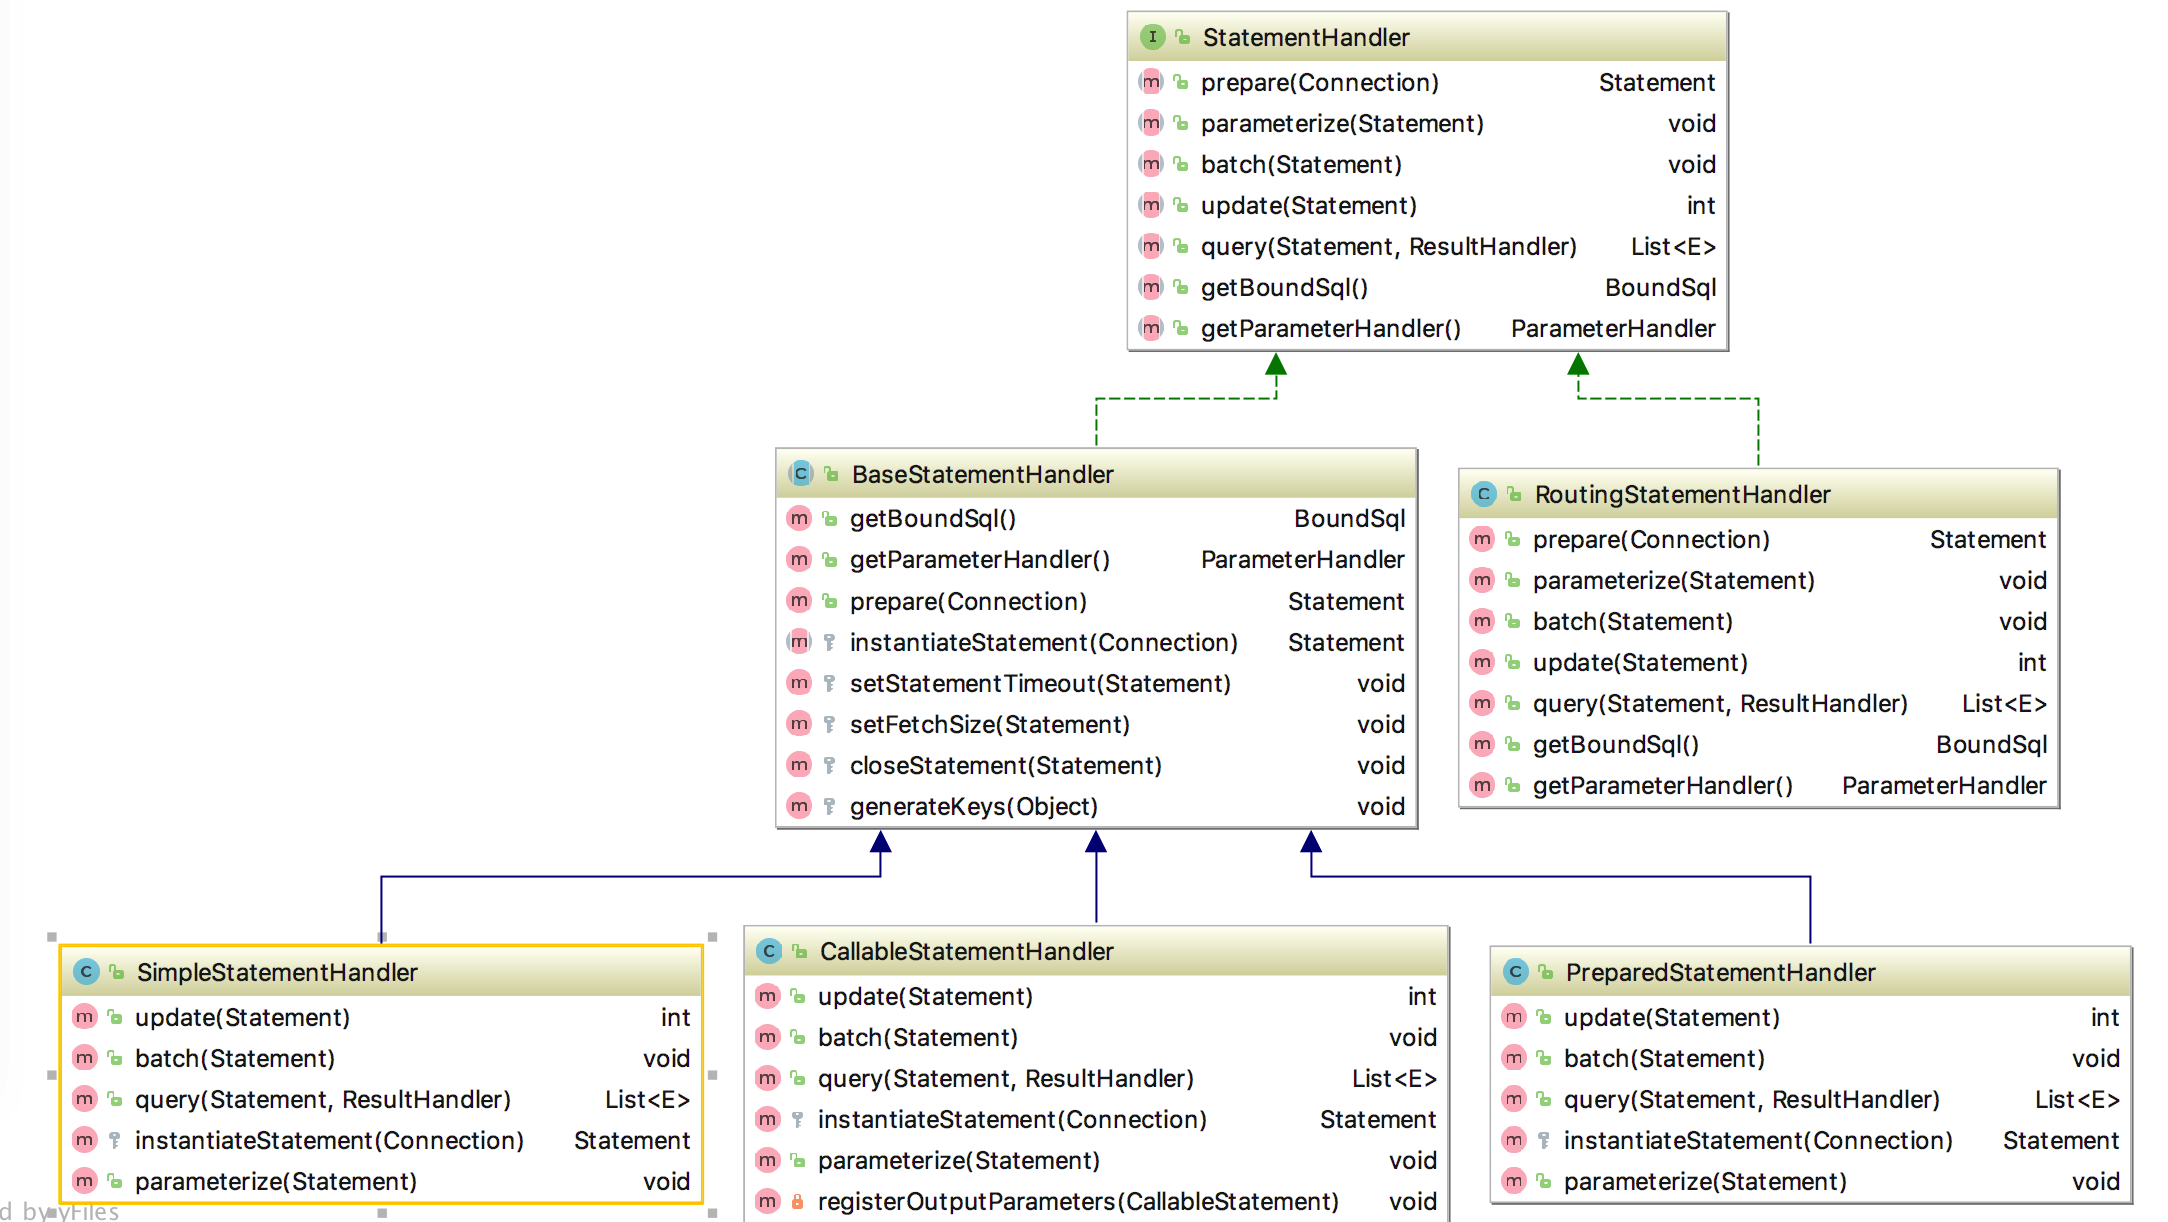
mybatis项目中有statement这个包,直接看其中的类。

StatementHandler定义了获取Statement的接口
1
2
3
4
5
6
7
8
| public interface StatementHandler {
...
<E> List<E> query(Statement statement, ResultHandler resultHandler)
throws SQLException;
Statement prepare(Connection connection)
throws SQLException;
...
}
|
BaseStatementHandler实现了prepare接口,并留了一个钩子函数instantiateStatement
1
2
3
4
5
6
7
8
9
10
11
12
13
14
15
16
17
18
19
20
21
22
23
24
| public abstract class BaseStatementHandler implements StatementHandler {
...
@Override
public Statement prepare(Connection connection) throws SQLException {
ErrorContext.instance().sql(boundSql.getSql());
Statement statement = null;
try {
statement = instantiateStatement(connection);
setStatementTimeout(statement);
setFetchSize(statement);
return statement;
} catch (SQLException e) {
closeStatement(statement);
throw e;
} catch (Exception e) {
closeStatement(statement);
throw new ExecutorException("Error preparing statement. Cause: " + e, e);
}
}
protected abstract Statement instantiateStatement(Connection connection) throws SQLException;
...
}
|
SimpleStatementHandler继承BaseStatementHandler并重写instantiateStatement
1
2
3
4
5
6
7
8
9
10
11
12
13
14
15
16
17
18
| public class SimpleStatementHandler extends BaseStatementHandler {
...
@Override
public <E> List<E> query(Statement statement, ResultHandler resultHandler) throws SQLException {
String sql = boundSql.getSql();
statement.execute(sql);
return resultSetHandler.<E>handleResultSets(statement);
}
@Override
protected Statement instantiateStatement(Connection connection) throws SQLException {
if (mappedStatement.getResultSetType() != null) {
return connection.createStatement(mappedStatement.getResultSetType().getValue(), ResultSet.CONCUR_READ_ONLY);
} else {
return connection.createStatement();
}
}
...
}
|
这里有一个两个成员变量,我们先mark一下,稍后再去阅读。
- MappedStatement 现在知道它可以获取resultSetType。
- BoundSql 获取sql
SimpleStatementHandler实现了StatementHandler提供的query接口方法,通过statement.execute执行。
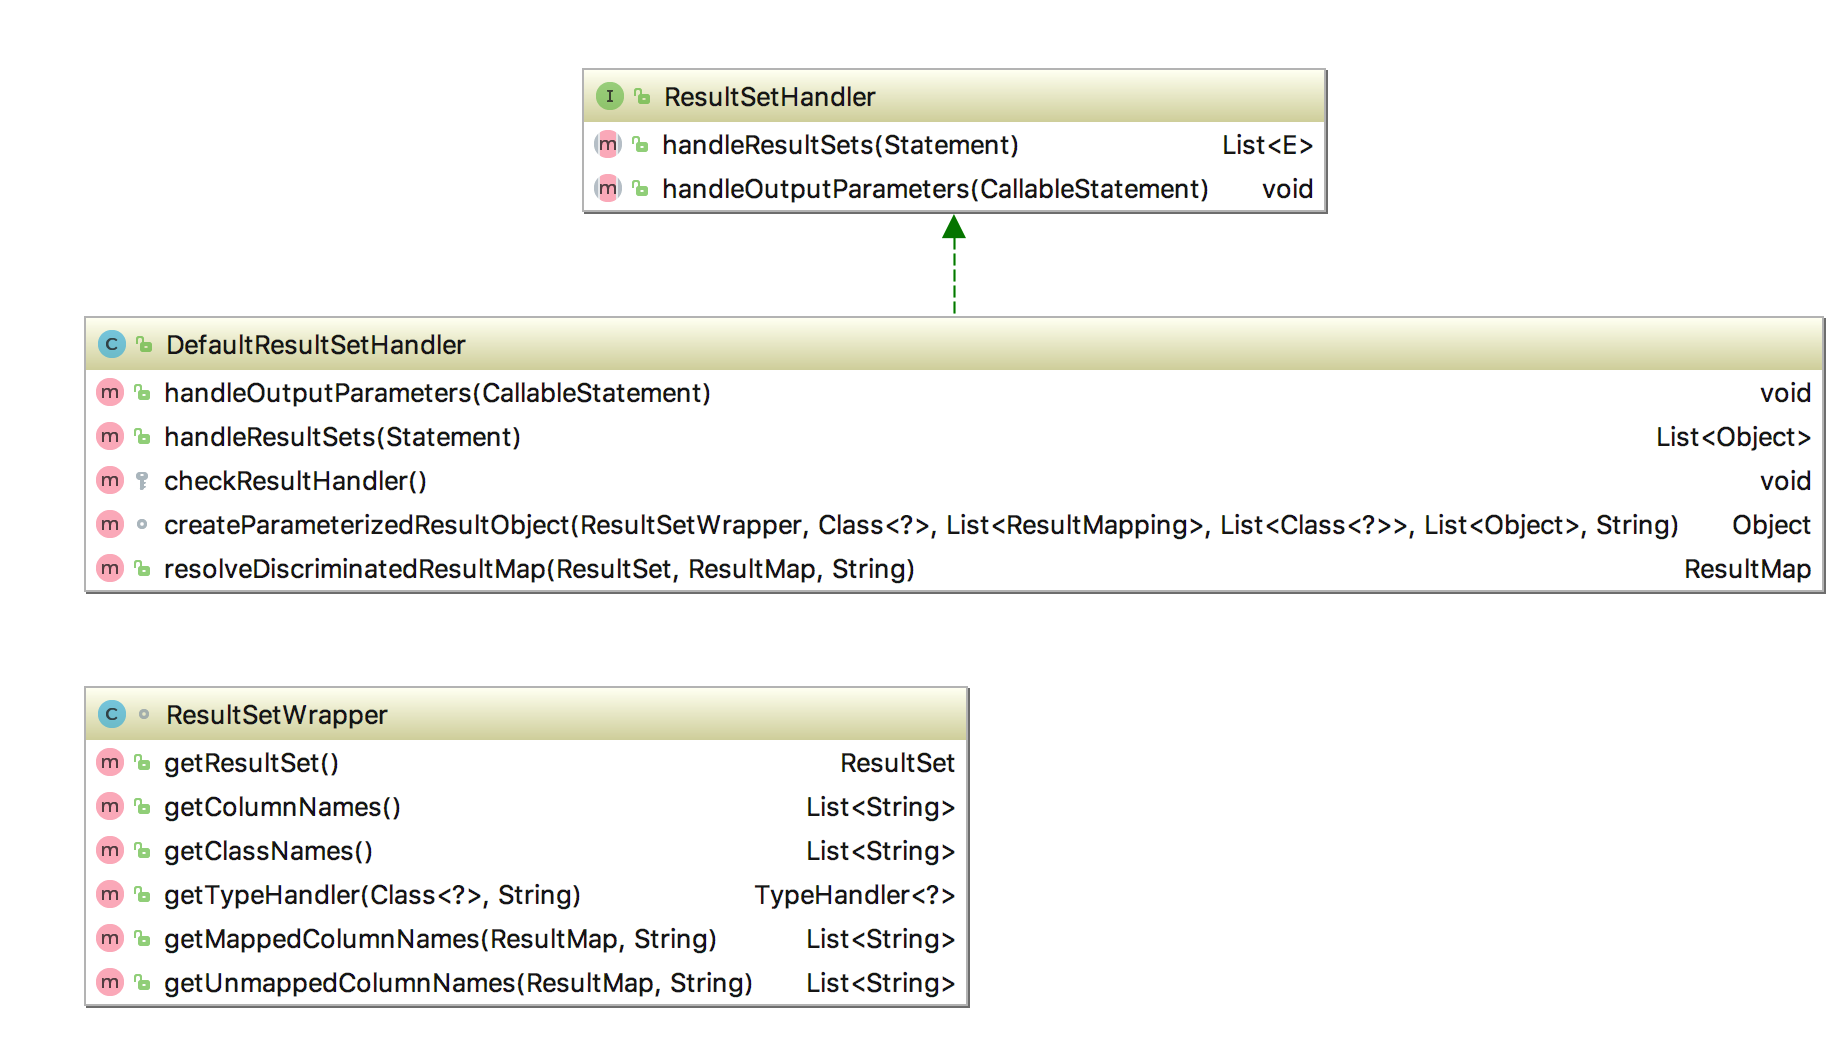
3.4. ResultSet
MyBatis被称为半个ORM系统,就是因为它对ResultSet的映射。我们来看一下实现,同样有一个包名叫resultset。。


